
Microsoft Planner is an Office 365 work management tool where you can:
- create plans
- assign tasks,
- chat about tasks
- see charts of your team's progress.
Your plan is shared with your team using a Microsoft Teams and Planner also allow you to allocate tasks via a Team’s channel.
All the plan’s actions can be viewed on a Teams tab, within the tasks application in Teams and via Planner for the web. There are slight difference between Planner via Teams and for the web.
Functionality within Planner
Plan actions can be viewed on a Teams tab, the Tasks app in Teams and viewing through Planner for the web., Most functions exist in all methods, detailed differences are listed in the ‘Plan actions in Teams versus Planner for Web’ section of the article “Use Planner in Microsoft Teams”.
The To do application
The To Do application within Planner can be used for listing your own tasks, and displays your MS Outlook My Tasks.
Bucket application
The bucket functionality within Planner allows you to allows you to group tasks into what are called Buckets. Buckets can be used to categorise your tasks by topic, stage or any other element you choose.
User permissions
The Department of State Growth, has implemented Microsoft Planner with Microsoft Teams, which means permissions are linked to Teams membership.
The MS Team’s owners are the planner’s owners, only team owner can create plans, both team owner and team members can create and modify tasks.
Create a Microsoft Planner plan in Microsoft Teams
Adding a planner tab
- Launch Microsoft Teams and navigate to the Team and channel you would like to add a plan to.
- Click + button to add a tab from the Channel Tab menu.

- Select Tasks by Planner and To Do from the list of apps.
- Select Create a new plan and add a name for the planner
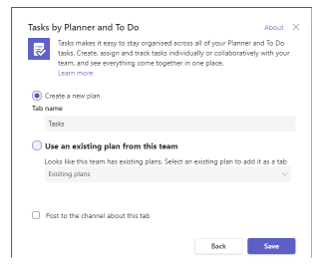
- Click Save and the Planner tab will be visible on the Channel Tab menu and the default Planner home screen will be visible
Create a new Task
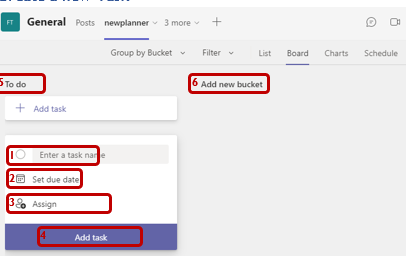
Enter the following details:
- Task name
- Set due date (if any)
- Assign the task (if any)
- Click Add task once you have entered the above details
- The Bucket is used to group tasks, click on the name to rename an existing bucket
- Add new bucket to add another grouping. You can then add tasks to that Bucket or drag and drop tasks between buckets.
- Enter more details for the task by clicking the task name
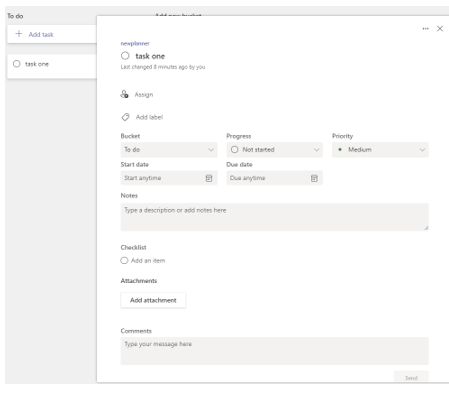
Additional Tasks details
The screenshot below shows details that you can utilise, you might find the Checklist useful.
Using the Planner and Tasks
Other functions in a plan include:
Complete
A task can be marked as Completed by clicking the checkmark icon on the left of the Task name.

Delete
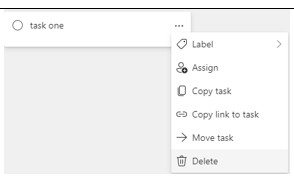
Caution:
- ANY Team member can delete any task (their own or others) so best to only delete a task if absolutely necessary and if you are sure no one else in the Team needs the information.
- Tasks cannot be recovered once deleted.
To delete a single task, click the three-dot ellipses options menu … on the right of the task box and select Delete.
Tasks by Planner and To-Do interface
Tasks by Planner and To Do is available in the Apps menu on the left-hand side of Teams.

Key functions in the interfaces are highlighted below
- My tasks To do – groups together all of your personal tasks whether from a personal to-do list or from any group plan. Personal tasks listed here are the same as your MS Outlook Tasks.
- Assigned to me groups together tasks from all groups that have been assigned to you
- Shared Plans - shows all teams that contain plans. Click the Team to view all plans in that team and then that plan to see all tasks

Display Options
Plans can be viewed using Board, Chart, or Schedule view, or in the List view unique to the Tasks app. They can be filtered by Keyword, Label, Priority, Bucket, Assignment and Due date.
View | Features |
Board view |
|
Chart | 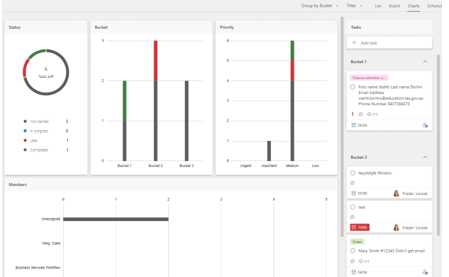 |
Schedule | 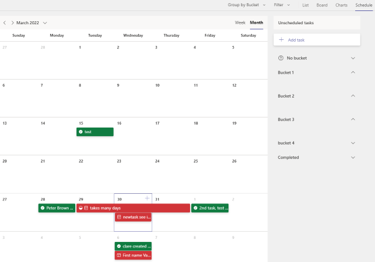 |

Integration with Outlook
Email notification
By default the end user will receive a daily reminder of late tasks, an example is shown below, you can Manage Planner notifications (microsoft.com).

Add plan to Outlook calendar
If you would like to connect tasks assigned to you from Planner to Outlook,
- Follow this link https://tasks.office.com/stategrowthtas.onmicrosoft.com/en-AU/Home/Planner/#/userboard
- Click the 3 dots ellipsis menu to reveal the choice to Add “Assigned to me” to Outlook calendar

- Make sure Publish, and share with anyone is selected
- Click Add to Outlook. The browser will open a new tab with your Outlook Calendar subscription window.

- Options available to change are:
- Plan names,
- Colour theme,
- Charm (Icon), or
- In which group you would like this calendar to appear, if not under Other calendars.

- Click Import to finish the process.
- The imported calendar will appear in Other Calendars and when selected will sit side by side with your own Outlook calendar. If you want to view both calendars as one, go to View > Overlay
Please note, that the synchronisation is only one way, from Planner to Outlook.

Common tasks
- Add a checklist to a task (microsoft.com)
- Copy a plan, Copy a plan (microsoft.com), and explain the steps and what the details have been copied, this can be found in Planner for the web at the moment.
- Manage Planner notifications (microsoft.com) explains:
- Turn group notifications for task activities on or off
- Manage how you are notified as a planner member
- Manage planner notifications
- Planner notification types
- Export a plan to Excel, ‘Export a plan to Excel (microsoft.com)’
- (By Teams owner only) Remove a Planner tab or delete a plan, which can be found in Use Planner in Microsoft Teams